Activities for the Home
Ages 0-6:
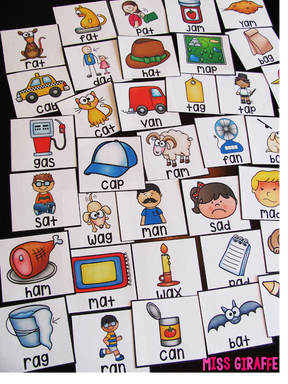
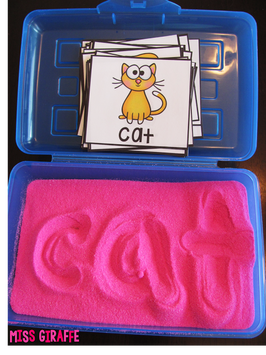
I refer to these cards a few times throughout these activities so here is an example of what you could make. These ones are made specifically for the short 'a' sound but you could use any words you want to.
Reverse white-board writing
Materials needed:
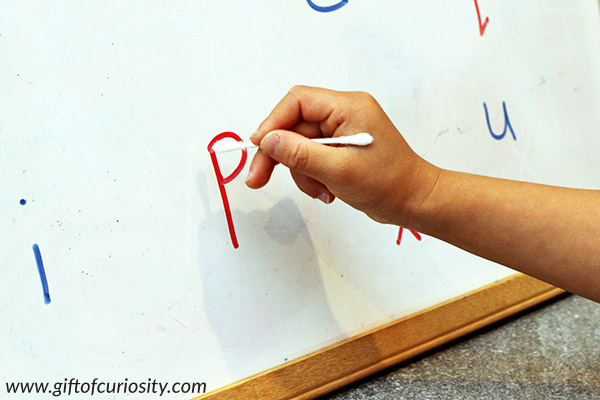
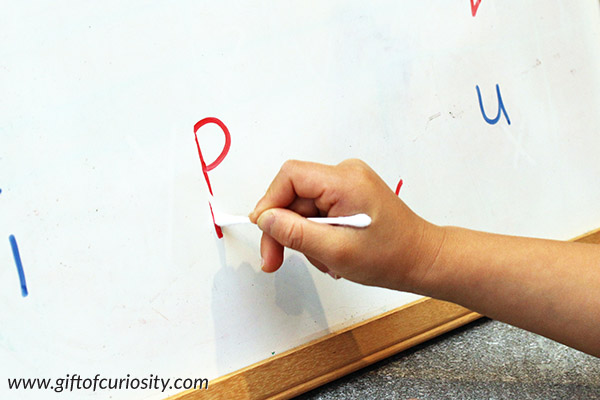
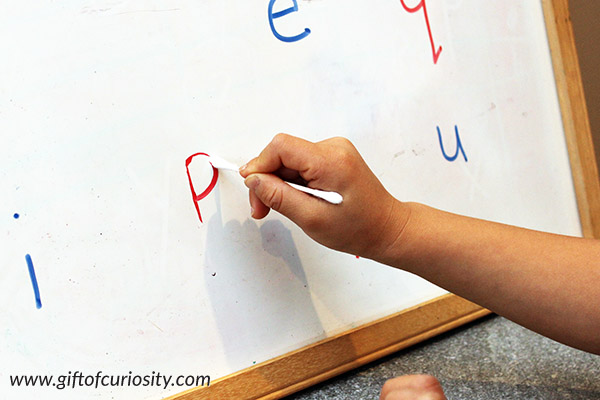
In this activity, you, as the parent or guardian, write letters or words on a white board. Your child then uses their finger or a cotton bud to trace over the letter or words, rubbing them out. Alternatively, this activity can be done on a chalk board with a paint brush and water or a wet finger.
This activity can be used with children as young as two as they begin to learn the alphabet. Simple letters can be traced and, as they get older and learn the patterns and shapes of creating letters, children can start to write more complex letters and eventually, words. When doing this activity with younger children, they can use their finger as it will be easier to control their movements and it will develop their fine motor skills until they can use a cotton bud in place of a pencil.
Materials needed:
- White board (a small one can be bought at Officeworks for $8, including markers and an eraser)
- Cotton bud (optional)
In this activity, you, as the parent or guardian, write letters or words on a white board. Your child then uses their finger or a cotton bud to trace over the letter or words, rubbing them out. Alternatively, this activity can be done on a chalk board with a paint brush and water or a wet finger.
This activity can be used with children as young as two as they begin to learn the alphabet. Simple letters can be traced and, as they get older and learn the patterns and shapes of creating letters, children can start to write more complex letters and eventually, words. When doing this activity with younger children, they can use their finger as it will be easier to control their movements and it will develop their fine motor skills until they can use a cotton bud in place of a pencil.
Sandbox writing
Materials needed:
Before beginning this activity, you will need to make a set of cards with words, and their corresponding picture, that are at the ability of your child. These words can include commonly used nouns, such as cat and dog that the child will be familiar with, but most three letter words are a good place to start. Once the cards have been printed, put the sand or alternative into the container. Now the activity is ready for your child. All they need to do is copy the word printed on the card and write it into the sand.
This activity can be done with children aged five and older. As well as getting children to practice their writing skills, this activity also practices:
As mentioned in the reverse white-board writing activity, when doing this activity with younger children, they can use their finger as it will be easier to control their movements. As children get older, they can begin to use a pencil, practicing correct holding of the pencil as they write. Also, with older children, more complex words can be used to suit their skill level.
Materials needed:
- Deep container
- Sand (sugar or salt can be used as an alternative)
- Set of word/picture cards
Before beginning this activity, you will need to make a set of cards with words, and their corresponding picture, that are at the ability of your child. These words can include commonly used nouns, such as cat and dog that the child will be familiar with, but most three letter words are a good place to start. Once the cards have been printed, put the sand or alternative into the container. Now the activity is ready for your child. All they need to do is copy the word printed on the card and write it into the sand.
This activity can be done with children aged five and older. As well as getting children to practice their writing skills, this activity also practices:
- reading, as they read the word (with parent’s assistance) they need to write
- spelling, as they need to copy the correct spelling of the word
- making real-world connections, as they use the pictures to learn what the word means - For example, reading and writing the word cat, seeing the picture of a cat and associating the picture to when they have seen a cat
As mentioned in the reverse white-board writing activity, when doing this activity with younger children, they can use their finger as it will be easier to control their movements. As children get older, they can begin to use a pencil, practicing correct holding of the pencil as they write. Also, with older children, more complex words can be used to suit their skill level.
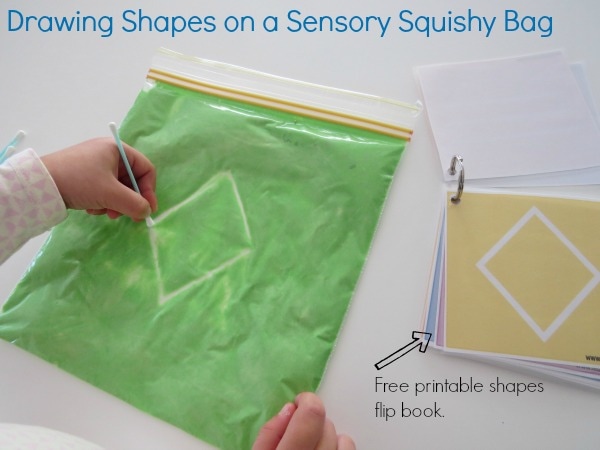
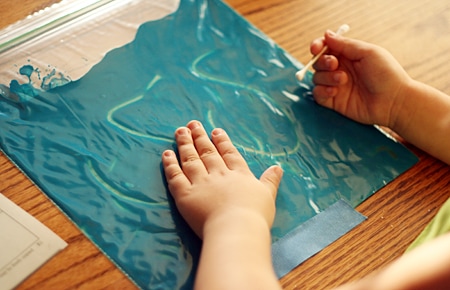
Squishy-bag writing
Materials needed:
To make a squishy bag just put some paint (or coloured hair gel) into a zip-lock bag, push all the air out and seal. Make sure the bag hasn't got too much or too little paint in it; there should be enough paint in it so when children write/draw on the bag, the underneath surface can be seen through the letters.
This activity can be done in two ways depending on the age and ability of your child. The first way can be done with children aged 2-4 as it practices pre-writing skills through learning shapes and patterns that are used in writing letters and develops their fine motor skills. As in the sandbox writing activity, you will need to print off some word/picture cards for your child to copy that show different shapes and patterns. Then, using their finger, the child copies the shape into the squishy bag. As the child gets older they can handle more complex shapes and can begin using a cotton bud to practice writing with a pencil.
The second way can be done with children aged 5 and up and is very similar to the sandbox writing activity. In this activity, children use the word/picture cards to copy and write from but use a squishy bag instead of a sandbox. Once the squishy bag is made, lay it on the table and let your child use their finger (or the blunt end of a pencil, depending on their ability) to 'write' on the bag by pressing the letters into the paint or hair gel.
Materials needed:
- Medium or large sized zip-lock bag
- Non-toxic paint or hair gel and food dye
- Set of word/picture or shape cards
To make a squishy bag just put some paint (or coloured hair gel) into a zip-lock bag, push all the air out and seal. Make sure the bag hasn't got too much or too little paint in it; there should be enough paint in it so when children write/draw on the bag, the underneath surface can be seen through the letters.
This activity can be done in two ways depending on the age and ability of your child. The first way can be done with children aged 2-4 as it practices pre-writing skills through learning shapes and patterns that are used in writing letters and develops their fine motor skills. As in the sandbox writing activity, you will need to print off some word/picture cards for your child to copy that show different shapes and patterns. Then, using their finger, the child copies the shape into the squishy bag. As the child gets older they can handle more complex shapes and can begin using a cotton bud to practice writing with a pencil.
The second way can be done with children aged 5 and up and is very similar to the sandbox writing activity. In this activity, children use the word/picture cards to copy and write from but use a squishy bag instead of a sandbox. Once the squishy bag is made, lay it on the table and let your child use their finger (or the blunt end of a pencil, depending on their ability) to 'write' on the bag by pressing the letters into the paint or hair gel.
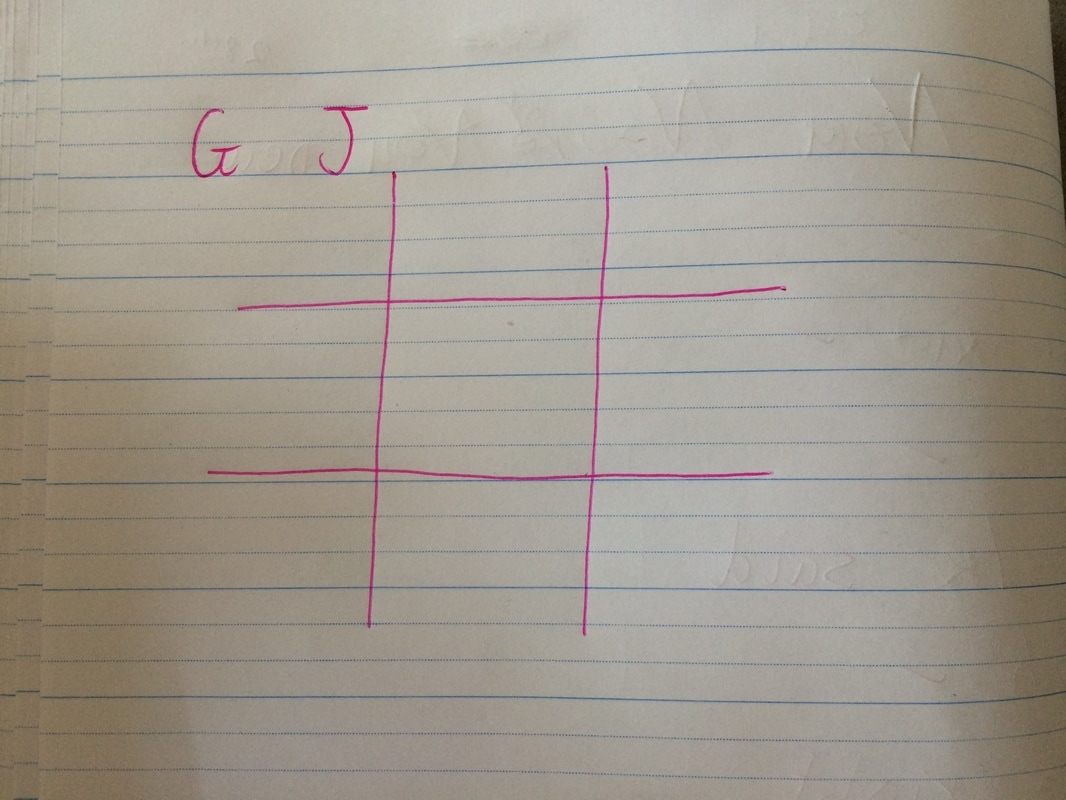
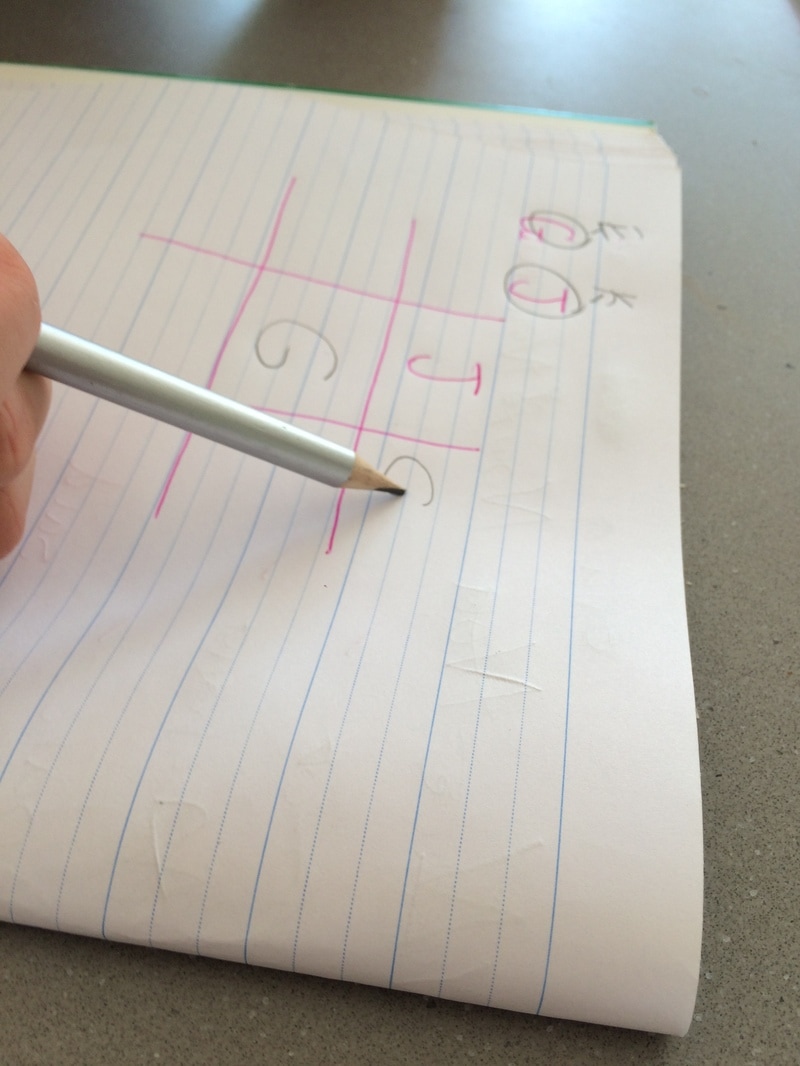
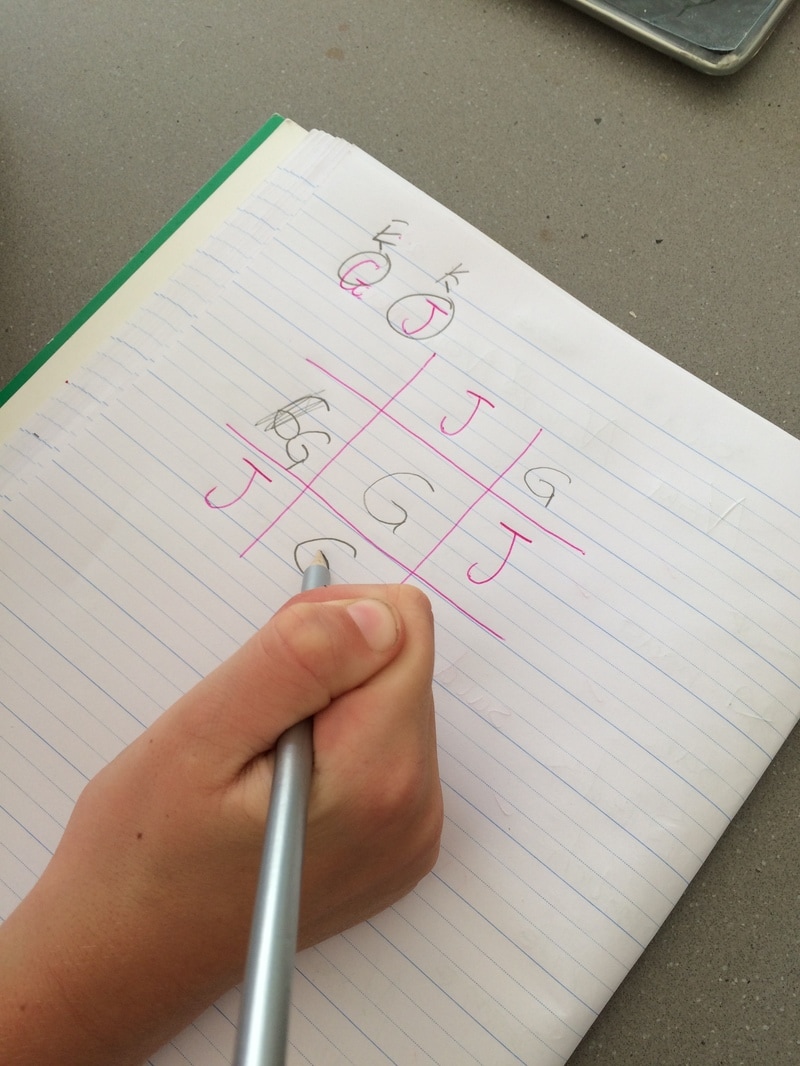
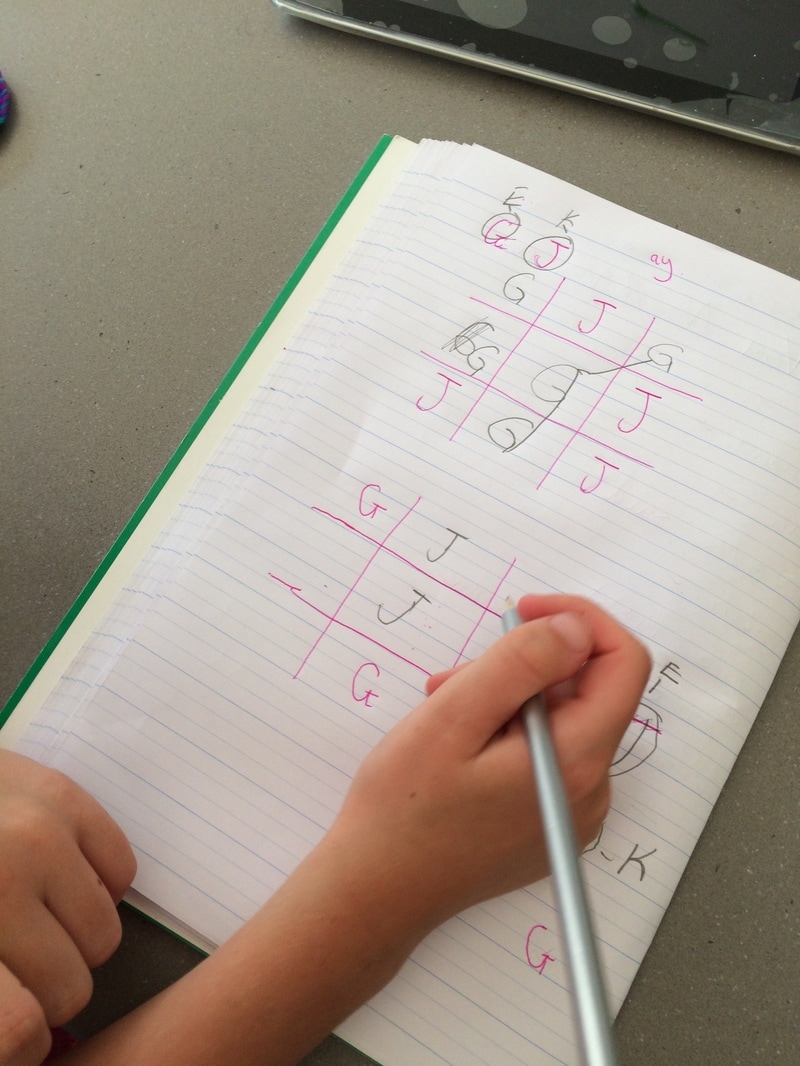
Letter Tic-Tac-Toe
Materials needed:
This game is very easy to set up and play. All you need to do is draw up a 3x3 tic-tac-toe grid and choose two letters that you want your child to practice. Once you have decided who is playing as each letter, take turns at writing your letter in a box on the grid, trying to block your opponent until one of you gets 3 in a row.
This game can be played with young children who are learning how to write their alphabet. This activity allows children to practice writing one letter repetitively in an engaging way. The letters you choose can be a letter that your child is having difficulty writing or a new letter that you are introducing to them. I have used this activity with a year 3 student who knew her alphabet but was getting confused with the naming of 'G' and 'J' so I chose these letters to play this game with her. Throughout the game I would ask her what letter she or I were writing so she could associate the name of the letter with the shape of it. This is another way you could use this activity.
Materials needed:
- Paper
- 2 Pencils
This game is very easy to set up and play. All you need to do is draw up a 3x3 tic-tac-toe grid and choose two letters that you want your child to practice. Once you have decided who is playing as each letter, take turns at writing your letter in a box on the grid, trying to block your opponent until one of you gets 3 in a row.
This game can be played with young children who are learning how to write their alphabet. This activity allows children to practice writing one letter repetitively in an engaging way. The letters you choose can be a letter that your child is having difficulty writing or a new letter that you are introducing to them. I have used this activity with a year 3 student who knew her alphabet but was getting confused with the naming of 'G' and 'J' so I chose these letters to play this game with her. Throughout the game I would ask her what letter she or I were writing so she could associate the name of the letter with the shape of it. This is another way you could use this activity.
The above pictures were taken with the consent of the children’s parents.
Proof of this can be shown if necessary.
Proof of this can be shown if necessary.
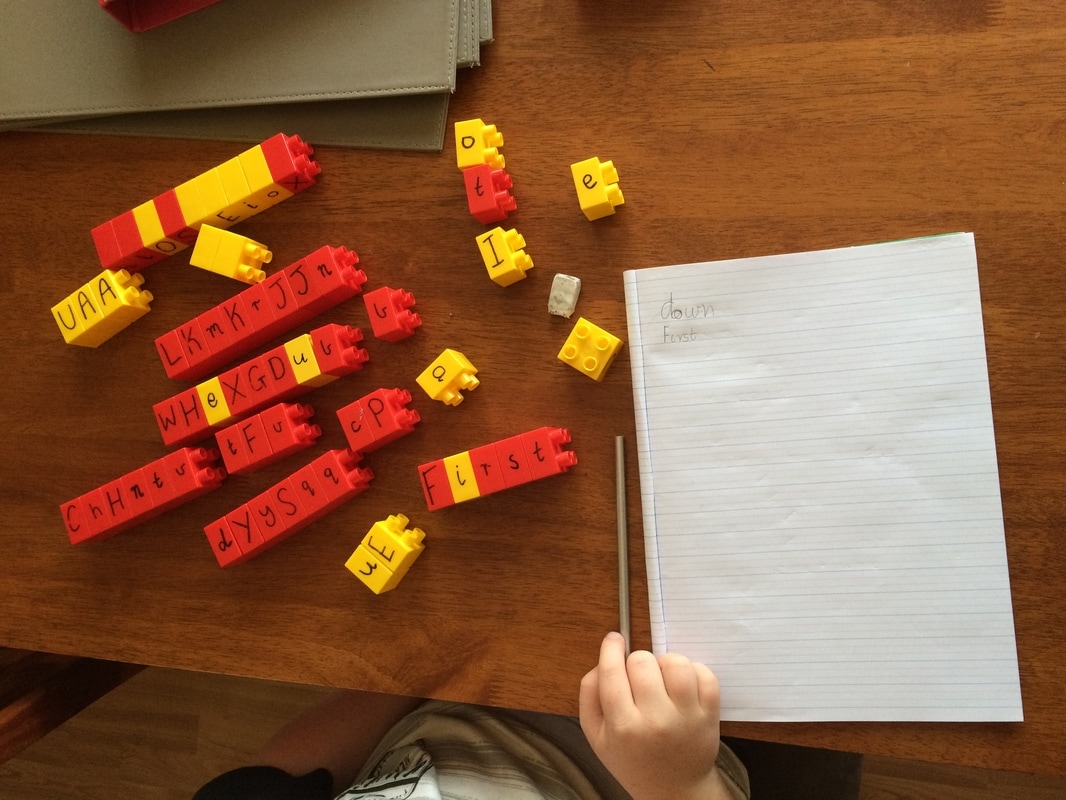
Connect a word
Materials needed:
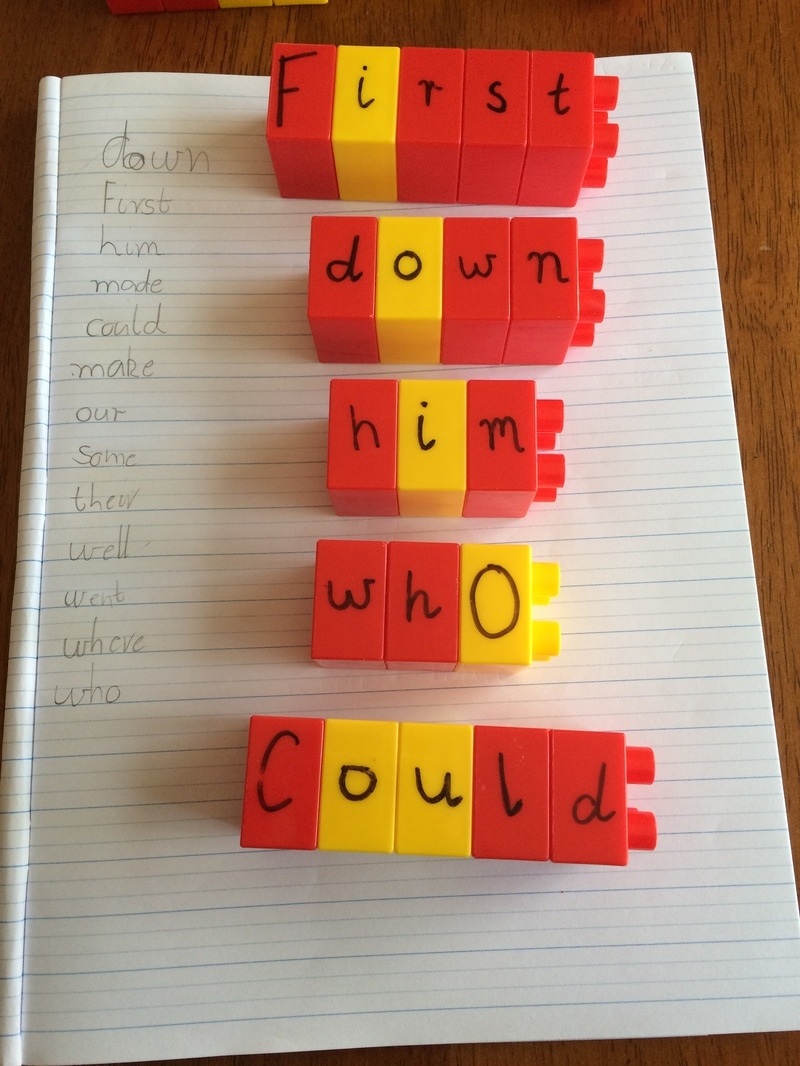
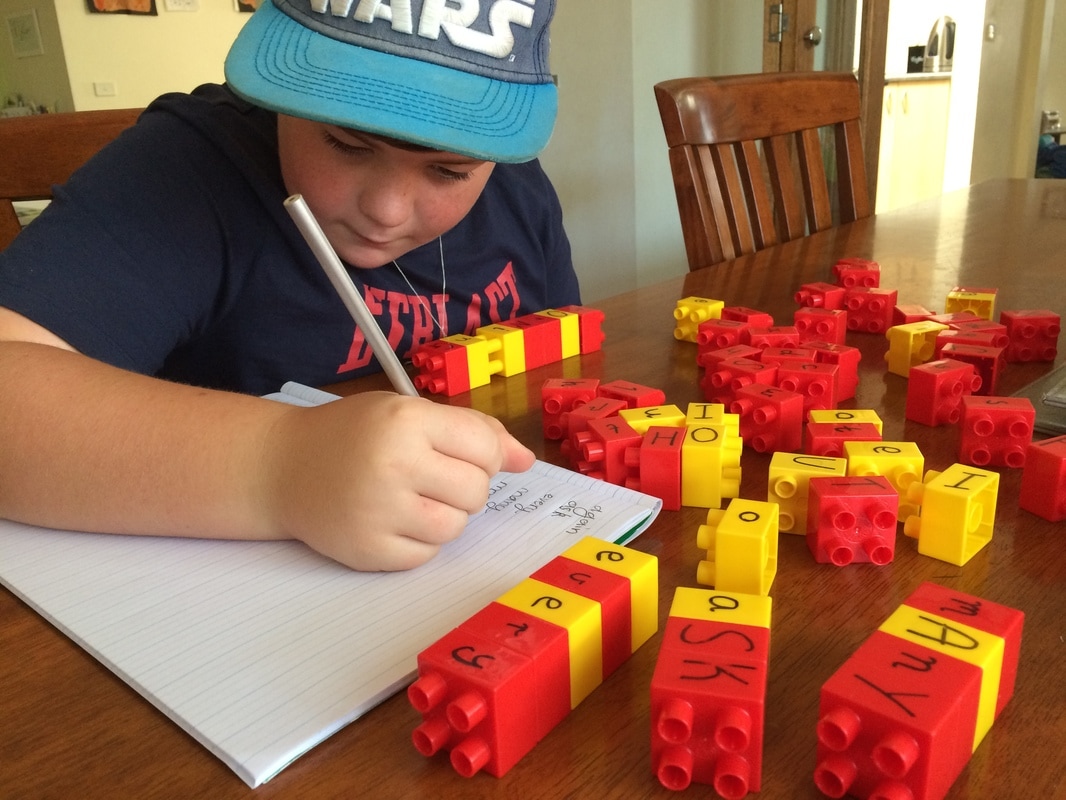
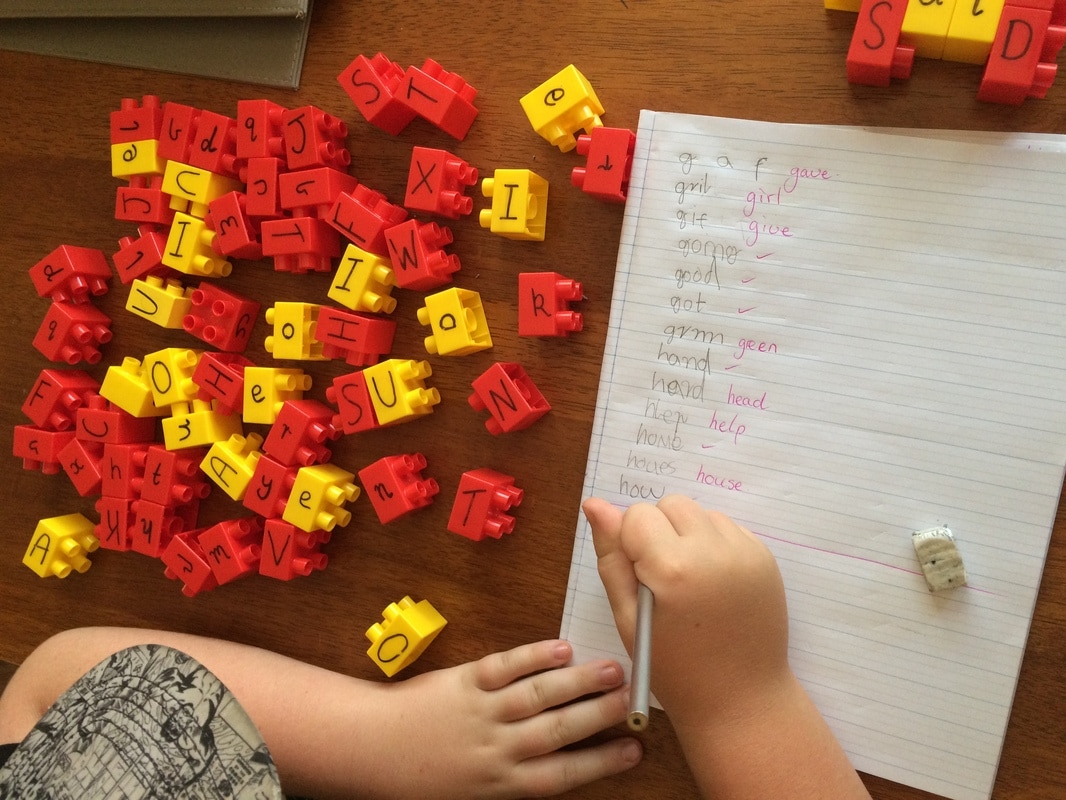
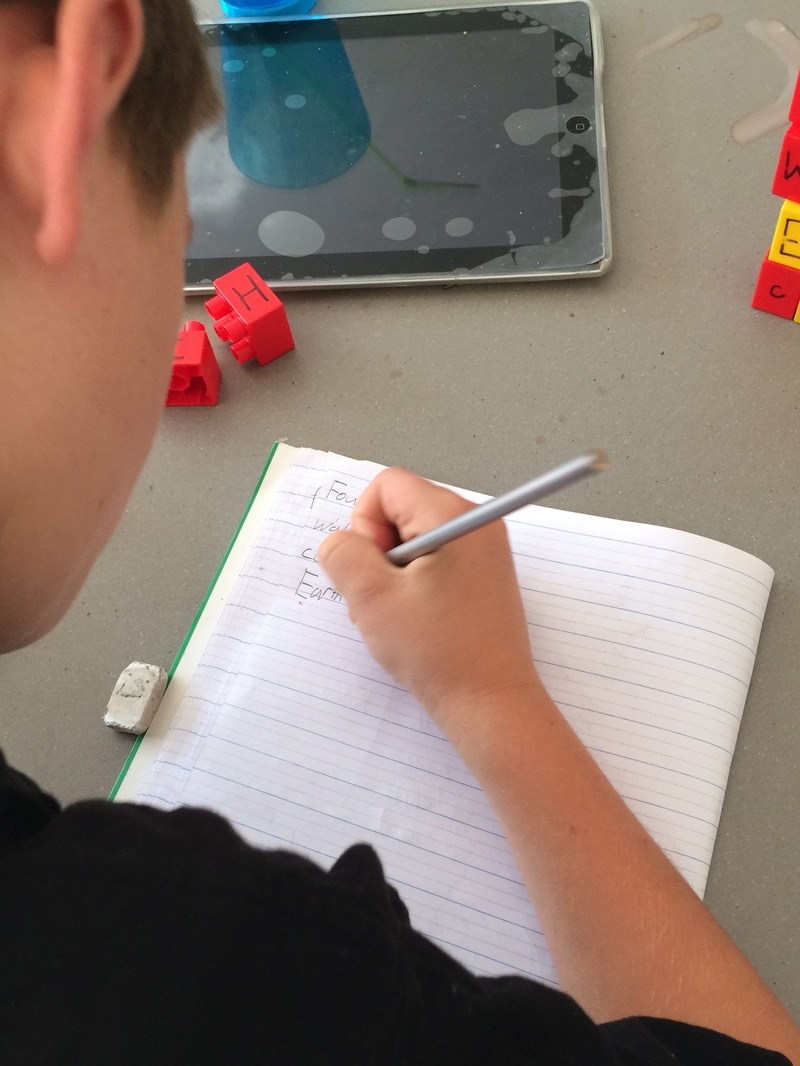
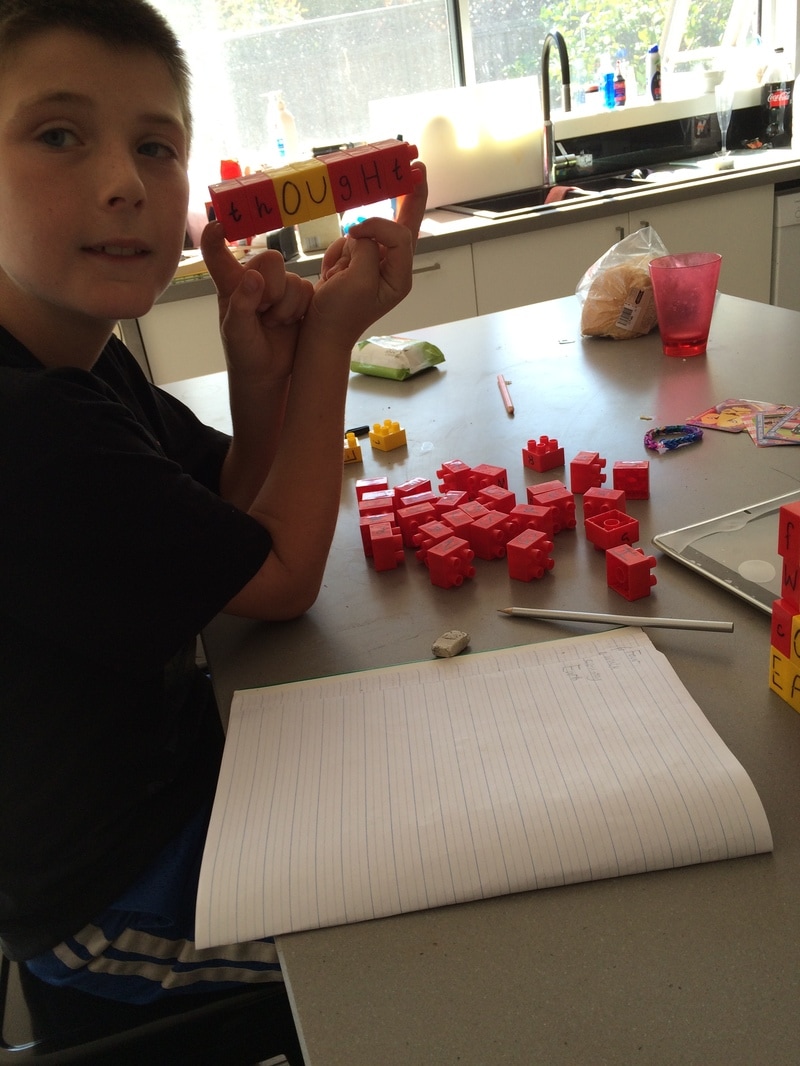
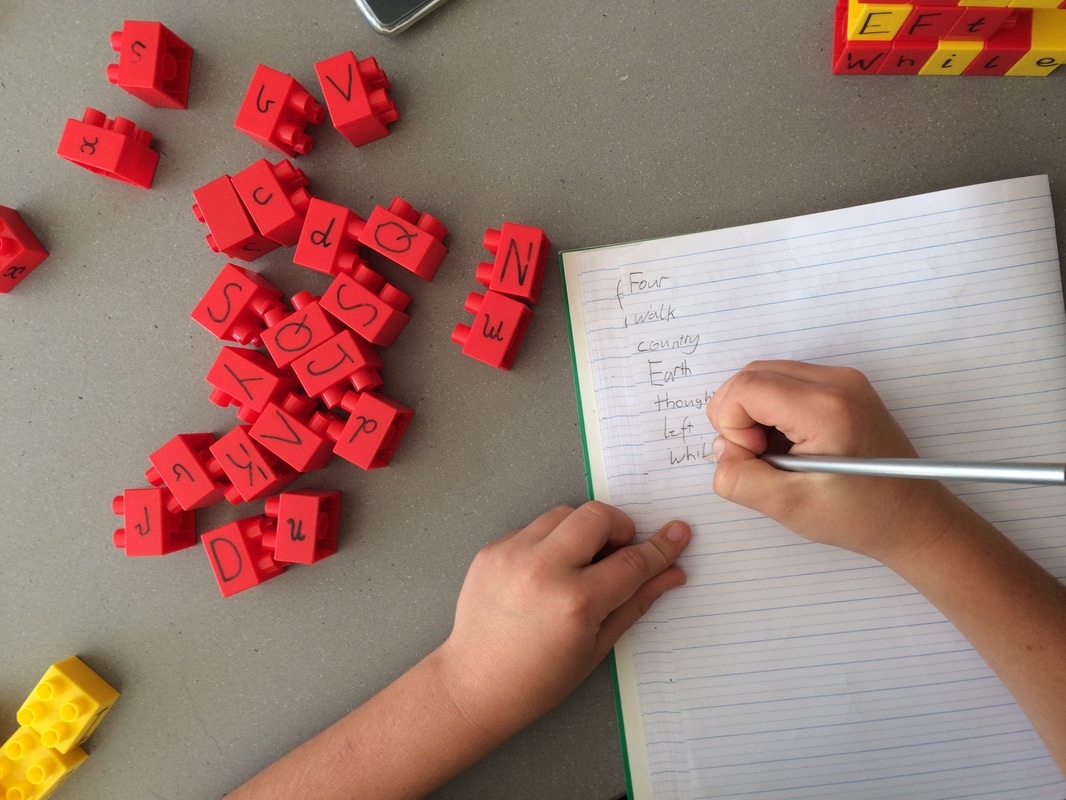
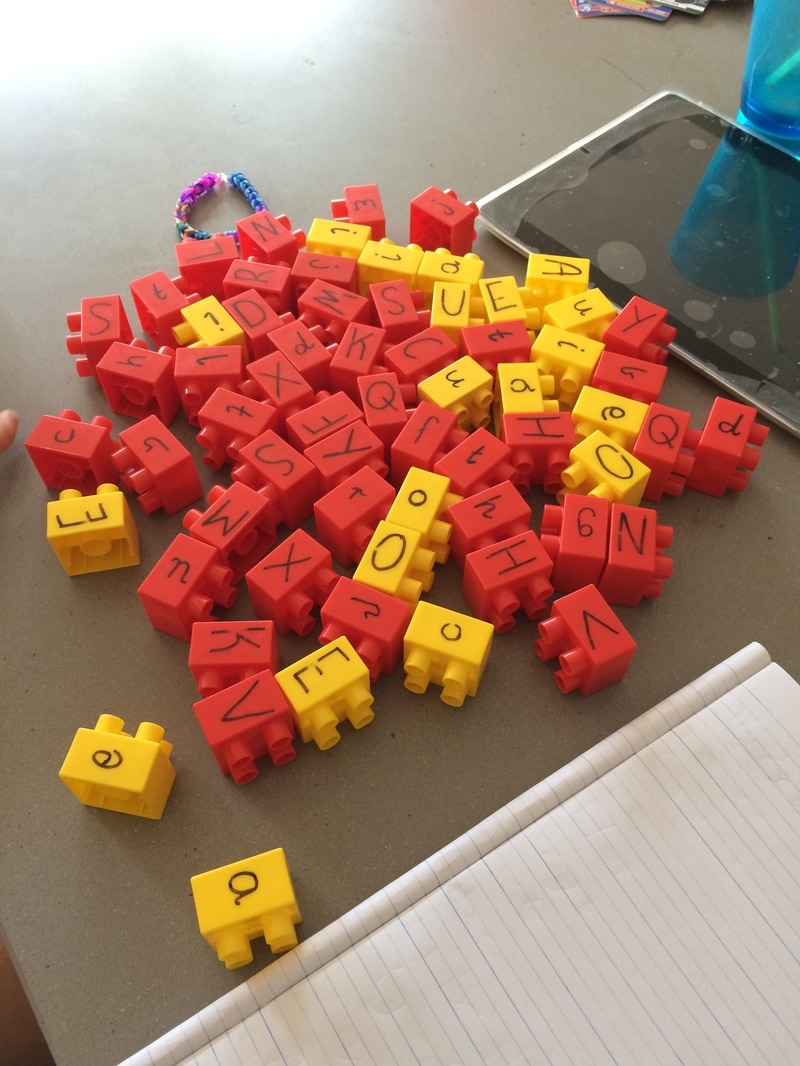
All you need for this activity is some letter blocks. To make these, just write all the letters of the alphabet on the blocks in permanent marker. Make sure all the blocks are facing the same way when writing on them. When I make them, I use yellow blocks for vowels and red blocks for consonants. Also, I make at least 5 of each vowel and 3 each of the most commonly used consonants; T, N, S, H, R, D, L and C. With the blocks made, all your child needs to do is use them to make words and then copy them down on paper. These words can be words that you come up with on the spot, relevant to your child or you can use the word/picture cards, similar to the ones used in sandbox writing and squishy bag writing.
This activity is a great hands-on activity that can be used with children of any age from 4 to 10, depending on skill level, to practice a multitude of skills. With younger children, using the word/picture cards can help them make links to the object as well as learning how to spell and create it with the blocks. Both the word/picture cards and the blocks will help the child with writing as they can directly copy the letters. With older children, there is no need for the word/picture cards. Instead, read off particular words that you want your child to spell and write. Children can practice their spelling by either thinking about how to spell the words you tell them or by copying the spelling straight from the cards. Also, they practice their writing skills by writing the words they create with the blocks.
Personally, I have had a lot of success with this activity; using it to make spelling tests more fun and engaging. I have found that my students enjoy using the blocks more than just writing down the words I read off. They also find it helps them spell the words as they can play around with different letter combinations and change the spelling more easily than just writing it down.
Materials needed:
- Connective blocks (I use Lego Duplo Blocks)
- Permanent marker
- Word/picture cards (optional)
All you need for this activity is some letter blocks. To make these, just write all the letters of the alphabet on the blocks in permanent marker. Make sure all the blocks are facing the same way when writing on them. When I make them, I use yellow blocks for vowels and red blocks for consonants. Also, I make at least 5 of each vowel and 3 each of the most commonly used consonants; T, N, S, H, R, D, L and C. With the blocks made, all your child needs to do is use them to make words and then copy them down on paper. These words can be words that you come up with on the spot, relevant to your child or you can use the word/picture cards, similar to the ones used in sandbox writing and squishy bag writing.
This activity is a great hands-on activity that can be used with children of any age from 4 to 10, depending on skill level, to practice a multitude of skills. With younger children, using the word/picture cards can help them make links to the object as well as learning how to spell and create it with the blocks. Both the word/picture cards and the blocks will help the child with writing as they can directly copy the letters. With older children, there is no need for the word/picture cards. Instead, read off particular words that you want your child to spell and write. Children can practice their spelling by either thinking about how to spell the words you tell them or by copying the spelling straight from the cards. Also, they practice their writing skills by writing the words they create with the blocks.
Personally, I have had a lot of success with this activity; using it to make spelling tests more fun and engaging. I have found that my students enjoy using the blocks more than just writing down the words I read off. They also find it helps them spell the words as they can play around with different letter combinations and change the spelling more easily than just writing it down.
The above pictures were taken with the consent of the children’s parents.
Proof of this can be shown if necessary.
Proof of this can be shown if necessary.
